Last Run on XCODE 14.2 / iOS 16.2 / Swift 5.7.2
Change the Back Button’s Icon Link to heading
If you have used the default Settings App that comes with iOS, you are most likely to be familar with the back button with the “less than” symbol “< Back” on the top left of your iOS devices screen (in the navigation bar). It’s something we have gotten very used to, thanks to it being implemented in not only the first party apps by Apple, but also the innumerous 3rd party apps that use the NavigationStack and related API’s.
It makes perfect sense to use the default behavior so as to not disrupt the customer’s expectation and experience. Although, wouldn’t it be nice to also have the ability to change the default beahvior with a different icon?
Infact, an app I am building launches to a screen with the detailed View instead of a list View and so I want to signify to the user that there are more items that can be selected. I also don’t want to confuse them with the deafult back button as if the launch screen was out of order. The icon I had in mind was something that could resemble a “hamburger” style menu, which will take the user to a screen that has all the items in a list view. Check out the screenshot below.
| Hamburger Menu | After Tapping on Hamburger Menu |
|---|---|
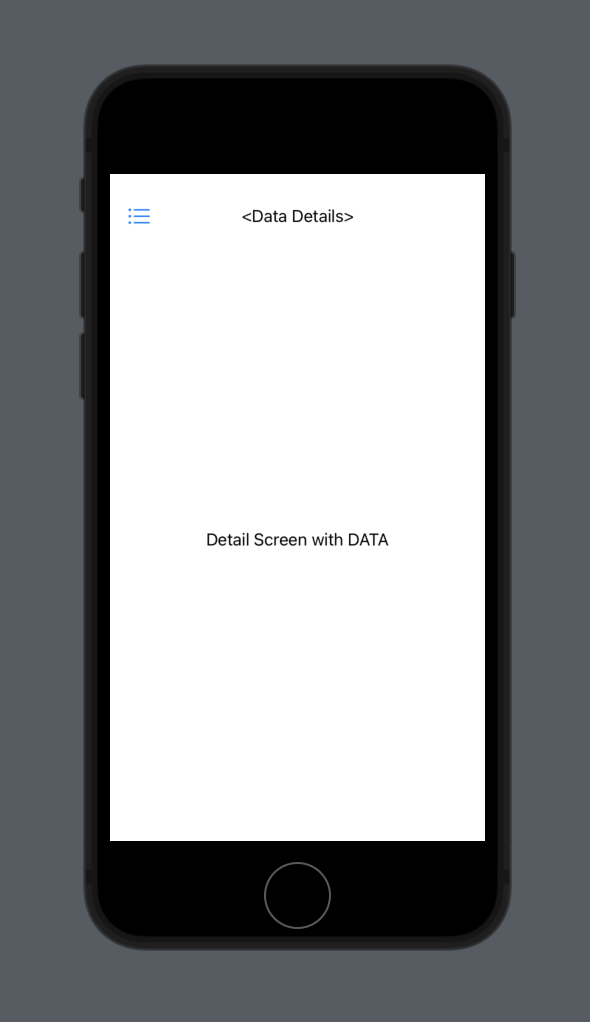 |
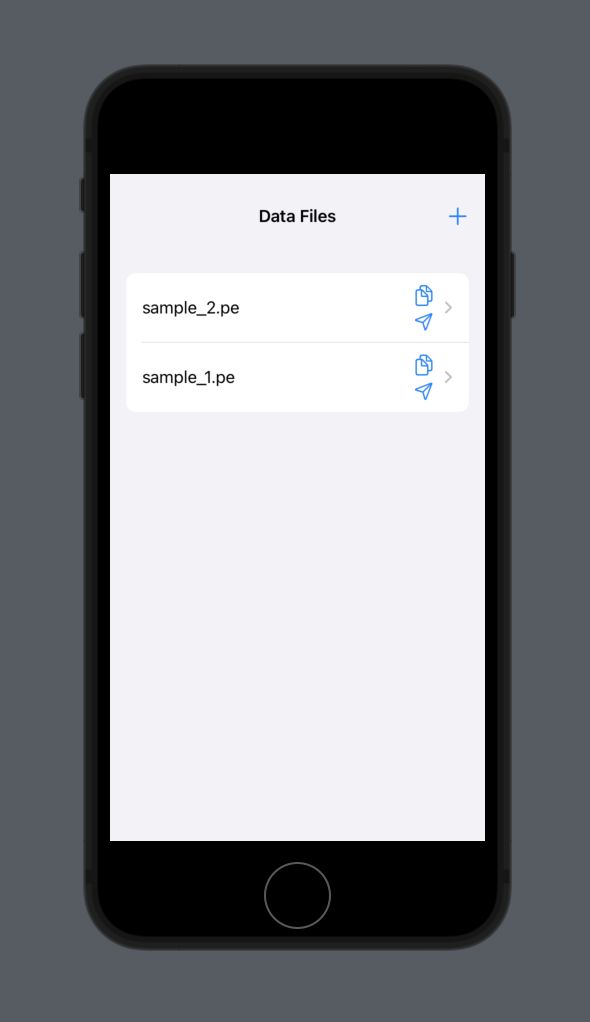 |
Fortunaly, this behevaior can be achieved in SwiftUI with a few simple steps
1. Hide the default Button Link to heading
The modifier .navigationBarBackButtonHidden() will work when this is added inside of a View within a NavivationView. The user will no longer be able to access the previous page after using this modifier.
.navigationBarBackButtonHidden()
2. Add a new toolbar button Link to heading
To allow the ability to go back to the previous page, you will have to add a ToolbarItem to be placed on the leading edge of the .toolbar. And on button tap, the code needs to call a dimiss() function provided by the Environment variable so as to remove the current view from the Stack and move to previous view.
.toolbar {
    ToolbarItem(placement: .navigationBarLeading) {
        Button {
            dismiss()
        } label: {
            Image(systemName: "list.bullet")
        }
    }
}
I have listed the relevant code samples below as reference.
struct AppFileDetailView: View {
    @Environment(\.dismiss) private var dismiss
    @Binding var fileData: String

    var body: some View {
        VStack {
            Text("\(fileData)")
        }
        .navigationBarBackButtonHidden()
        .toolbar {
            ToolbarItem(placement: .principal) {
                Text("<FileName>")
            }
            ToolbarItem(placement: .navigationBarLeading) {
                Button {
                    dismiss()
                } label: {
                    Image(systemName: "list.bullet")
                }
            }
        }
    }
}


struct AppFilesListView: View {
    @State var appFiles: [String] = ["sample_2.pe", "sample_1.pe"]
    @State var fileData: String = "Detail Screen with DATA"

    var body: some View {
        NavigationStack {
            List(appFiles, id: \.self) { name in
                NavigationLink(value: name) {
                    AppFileRowView(name: name)
                }
            }
            .navigationTitle("Data Files")
            .navigationBarTitleDisplayMode(.inline)
            .navigationDestination(for: String.self) { _ in
                AppFileDetailView(fileData: $fileData)
            }
    }

struct AppFileRowView: View {
    let name: String
    var body: some View {
        HStack {
            Text("\(name)")
            Spacer()
            VStack(alignment: .trailing, spacing: 5) {
                Button(action: {}) {
                    HStack {
                        Image(systemName: "doc.on.doc")
                    }
                }
                Button(action: {}) {
                    HStack {
                        Image(systemName: "paperplane")
                    }
                }
            }
        }
    }
}